In my last post I showed some video footage of this rainscreen installation, but I've gotten a few requests for some detail shots. If you've never seen this method of siding installation there are tons of resources on the web for details. Fine Homebuilding.com and Green Building Advisor.com both have some great articles in their archives, so that would be my first direction to look. If you want the science behind the approach head to buildingscience.com and read any one of many articles. Search on the Information tab for "Rain Screen". Here's a link to a great technical document on Rain Control.
Rainscreen: it all starts at the drainage plane. The 2x4 framed walls of this house were sheathed with 1/2" plywood (my preference over OSB), then we wrap the house in Tyvek Drainwrap (or Stuccowrap same product, different roll sizes). This is the crinkly version of Tyvek. Then the windows are installed and flashed using matching DuPont products per manufacturer's specifications. I've done tons of videos on this install. Here's a blog post on installing windows.
![]()
Ok so now we have established a flawless execution of drainage plane. This house is set to withstand the elements for the next 100+ years. Now, because we are laying foam on the outside of this drainage plane all the window trims need to be thicker than normal.
![]()
![]()
![]()
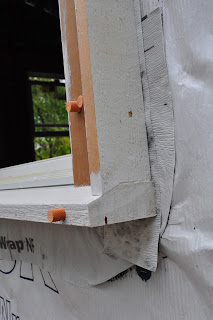
![]() This is a 2x4 Cedar trim with a 1x4 ripped to 3". The sills were milled onsite from Cedar 2x4's. I had my carpenters prime all sides of the trim that would be buried . These were screwed and plugged. Notice the kerf cut at the bottom of the sill for water shedding. Also, be sure to install a head flashing above your trim to keep water from sitting on any head trims.
This is a 2x4 Cedar trim with a 1x4 ripped to 3". The sills were milled onsite from Cedar 2x4's. I had my carpenters prime all sides of the trim that would be buried . These were screwed and plugged. Notice the kerf cut at the bottom of the sill for water shedding. Also, be sure to install a head flashing above your trim to keep water from sitting on any head trims.
![]() Next comes the 1" foam install. In our climate zone 1" Dow Foam at R- 5 will do amazing things for the house. I am especially fond of thicker foam because the next time this house gets remodeled may be 75 years from now and who knows what energy prices in 2082 will look like. The extra $$$ for thicker foam will be paying itself back many times over. If you are in a colder climate consider going much thicker. On my next project I'll probably shoot for 2 layers of 3/4" foam so I can stagger the seams.
Next comes the 1" foam install. In our climate zone 1" Dow Foam at R- 5 will do amazing things for the house. I am especially fond of thicker foam because the next time this house gets remodeled may be 75 years from now and who knows what energy prices in 2082 will look like. The extra $$$ for thicker foam will be paying itself back many times over. If you are in a colder climate consider going much thicker. On my next project I'll probably shoot for 2 layers of 3/4" foam so I can stagger the seams.
![]()
![]()
![]()
The rain screen battens can be made from many materials. I've been doing rain screen installs since 2002 when I learned the technique in Portland, OR. At that time we used 1/2" pressure treated plywood. I've also used rips of Hardiplank, and standard 1x4's. In this project we priced a commercially available product from Coravent, but decided to make it ourselves for a bit less money. We bought 3/8" corrugated plastic from Regal Plastics in North Austin and ripped the 4x8 sheets to the sizes we needed. The starter course has the vent holes running vertically and we wrapped it with a "U" shaped piece of 8" insect screen materials. Once these get installed it's pretty straightforward to install the siding. The only issue is fastener length. You can't nail the siding because you rely on the fastener shear strength so in this case we used 4" deck screws, countersunk the screws and used bondo to cover the fastener heads. The foam can handle 25psi of pressure so the screws hold the assembly very tightly in compression.
![]()
![]()
![]()
![]()
![]()
![]() Here's what it looked like before I started.
Here's what it looked like before I started.
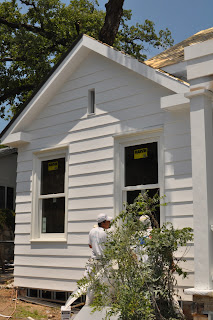
![]() And here's the house after we reinstalled the siding. Almost ready for drywall.
And here's the house after we reinstalled the siding. Almost ready for drywall.
Beautiful! I love my job! Special thanks for my amazing clients and Hugh Jefferson Randolph Architects, super fun to work on their amazing designs... Matt Risinger![]()
Rainscreen: it all starts at the drainage plane. The 2x4 framed walls of this house were sheathed with 1/2" plywood (my preference over OSB), then we wrap the house in Tyvek Drainwrap (or Stuccowrap same product, different roll sizes). This is the crinkly version of Tyvek. Then the windows are installed and flashed using matching DuPont products per manufacturer's specifications. I've done tons of videos on this install. Here's a blog post on installing windows.

Ok so now we have established a flawless execution of drainage plane. This house is set to withstand the elements for the next 100+ years. Now, because we are laying foam on the outside of this drainage plane all the window trims need to be thicker than normal.


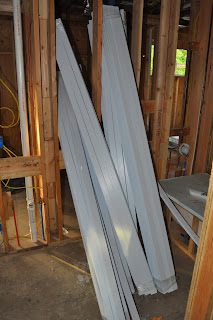


The rain screen battens can be made from many materials. I've been doing rain screen installs since 2002 when I learned the technique in Portland, OR. At that time we used 1/2" pressure treated plywood. I've also used rips of Hardiplank, and standard 1x4's. In this project we priced a commercially available product from Coravent, but decided to make it ourselves for a bit less money. We bought 3/8" corrugated plastic from Regal Plastics in North Austin and ripped the 4x8 sheets to the sizes we needed. The starter course has the vent holes running vertically and we wrapped it with a "U" shaped piece of 8" insect screen materials. Once these get installed it's pretty straightforward to install the siding. The only issue is fastener length. You can't nail the siding because you rely on the fastener shear strength so in this case we used 4" deck screws, countersunk the screws and used bondo to cover the fastener heads. The foam can handle 25psi of pressure so the screws hold the assembly very tightly in compression.


Also, I'm a big fan of EndCutz primer. See my carpenter dabbing this primer on the cut edge before installing.

The front of the house has the original long leaf pine siding and the back of the house has new yellow pine milled to a similar profile.


Beautiful! I love my job! Special thanks for my amazing clients and Hugh Jefferson Randolph Architects, super fun to work on their amazing designs... Matt Risinger
