Quantcast
Channel: Matt Risinger and the Green Building Blog
Viewing all 122 articles
Browse latest View live

Masonry Best Practice - Rock / Limestone with a Rainscreen

$
0
0
I really like Masonry clad buildings.  It's tough to beat the longevity, durablity, and easy maintence of a rock or brick facade.
Hugh Jefferson Randolph house I built a few years ago with a beautiful brick.
From a Building Science perspective Brick is a terrific building material because it's got a built-in air cavity between the brick and the house.  It's traditional for Mason's to leave 1" of air space between the back of the brick and the framed wall.  Brick & mortar are naturally porous and WILL LET WATER pass through so this 1" air gap is vital to drain the moisture out of the cavity.
Photo courtesy of medcot.com.  Brick with Tyvek CommercialWrap & a Mortar Net at the base
This airspace is hugely important.  It allows the brick to absorb water then dry to the front or the back of the brick.  Remember that brick is considered a "Reservoir Cladding" which means that it can soak up literally 10's of gallons of water then slowly release this moisture over time.  The waterproofing behind the brick is of immeanse importance in our Hot/Humid Texas climate.  Here's why:  Our hot climate means we run the sprinkler system ALOT and our brick exterior walls might be getting soaked 2-4x per week year round at 4AM when a homeowners landscape gets watered.  Then when the sun hits that same masonry wall at 10Am the vapor drive effect happens and can destroy a house over the years with the wetting of the walls.  See this video I shot to get an idea of the problem.

 The main point of the video is that we need a low perm, and very high quality housewrap that's 100% liquid water in-permeable.  I use Tyvek Commercial Wrap exclusively for my brick/rock houses.
  Ok, so Brick is relatively straightforward with it's 1" air gap but not all Masonry has that air space.  In fact, many rock exteriors here in Texas have zero gap behind the stone as they are fully mortared to the house.  Here's where a rainscreen product becomes necessary to force the air gap.  The photo's below are of a house utilizing Keene Driwall Rainscreen for a Limestone Rock install that wasn't going to have an airgap otherwise.  The product on the walls is Driwall 10mm.

Keene Driwall laid directly over the fully detailed Tyvek weather barrier.


This builder used Drainwrap, but I'd use CommercialWrap without the crinkles and a lower perm rating.


Here's a good shot to show why it's necessary.  Random pattern rock is prone to total fill mortar.  This poduct creates a rainscreen


The air gap this creates is vital to ensuring moisture is kept out of this wood framed house. 
Here's a sample of the Keene 020-1 product.  This side goes against the Tyvek and provides a stand off. 

This side has a filter fabric that lets water through but won't allow mortar to clog the air gap. 

I would consider this a Best Practice install of a Masonry Rock exterior.  This would also work for Stucco, Thin Stone/Brick, Manufactured Stone, and even could be used to create a rainscreen behind siding.
-Matt Risinger
Risinger Homes in Austin TX
Risinger Homes is a custom builder and whole house remodeling contractor that specializes in Architect driven and fine craftsmanship work. We utilize an in-house carpentry staff and the latest building science research to build dramatically more efficient, healthy and durable homes.
Be sure to check out my video blog on YouTube


Andersen 100 Series Windows Review

$
0
0
  Before I get into the review of this window, let me first tell you a bit about my background.  I'm a custom builder who works exclusively on homes designed by Architects.  I don't often specify the windows that go into the houses I build, but I do occasionally get to influence the decision.  Over the past 20 years of building I've worked with Vinyl, Wood, Clad Wood, Fiberglass, and Aluminum windows from most of the major brand names.
  I was first introduced to the Andersen 100 series when they came to market in 2009 and was immediately impressed.  I believe this house I built in 2009 was one of the first ones to get A100's in Texas.  Since 2009 I've put them into a dozen new homes and remodels. 

I love this recessed window detail we did on this house.
  
Price Comparisons:  The Andersen 100 series window is a composite frame window.  Andersen makes them from a mixture of Vinyl and Wood they call Fibrex(similar to a composite deck).  I also like that the wood in these windows is recycled wood fiber scraps from their wood window operations!  The upgrade in price to the A100 is not much compared to Vinyl and you get a much better product.  I consider this window to be a Vinyl killer.  There is no reason to use Vinyl now that you can buy A100's.  They are also less expensive than Fiberglass windows and perform on par.  Wood windows are much more expensive and again the performance is similar. 

Energy Ratings & Performance:  Look at the label from this Andersen 100 Casement my crew installed last week on a new house. 


In Texas we're looking for a SHGC number below .25 (lower is better) and a U-Factor (which measures overall insulation value) of .3 or lower.  This Casement has an incredibly low .19 SHGC and a U-Factor of .28.  This is a very high performing window! The Fibrex frame also makes this an incredibly durable window, and is not subject to rot.  They come in 5 exterior colors but by far the most popular color for the Architects we work with is Dark Bronze.  The inside is standard white color but it can be painted unlike a Vinyl window. 
Beauty:    Some windows are meant to be a feature, other stand out for being low quality.  This is neither.  The A100 is a window that blends into the background.  It's really a happy compromise: Relatively thin frame, generally crisp details, and paintable. I'm amazed how this cost-effective window looks great in a variety of styles of houses.  Here's some other photos of homes in construction or completed where we've used A100's. 
Modern house.  Love the fixed next to casement design on the top floor. 

The bottom floor of this house has Aluminum sliders that go nicely with the A100 Bronze windows upstairs.

I'm a big fan of casement and fixed glass. Here's A100's in both styles


Farmhouse with Bronze A100's and crisp white siding. 

 
 If you're looking for some install instructions here's a video of how to install them properly

In conclusion, I really like these Andersen 100 series windows.  For the price point, they are really tough to beat.  I highly recommend you check them out at a showroom near you.  If you are in Austin or Houston Texas, I buy mine from Mirror Gallery.  I've also seen them sold through Home Depot. 
-Matt Risinger
Risinger Homes in Austin TX
Risinger Homes is a custom builder and whole house remodeling contractor that specializes in Architect driven and fine craftsmanship work. We utilize an in-house carpentry staff and the latest building science research to build dramatically more efficient, healthy and durable homes.
Be sure to check out my video blog on YouTube

IAQ & Ventilation for Texas Homes

$
0
0
  If you read generally about the topic of Indoor Air Quality and Ventilation rates the theory is that the air inside our homes is "dirty" and needs to be diluted with "clean" air from outside.  So, does this theory hold true in the Hot/Humid climate zone of the Southern US, and how do we implement this in a thoughful way?  I find the air outdoors to generally be fantastic and "fresh" in January, but I don't always feel that way in July. 
  The generally accepted standard in the US for ventilation is ASHRAE 62.2.  This says the for every occupant you need 7.5 CFM of fresh air plus 1CFM per 100SF of floor space.  For instance a 3000 sq foot house with a family of 4 would need:  7.5x4 + 3000/100 = 30+30 = 60CFM or 60 cubic feet of fresh air per minute.  That's a lot of ventilation, especially if the air coming into the house is hot/humid.  This is a pretty broad rule, but is there any better or more specific advice on this topic?   
  Building Science Teacher Joe Lstiburek's advice is: "Dilution is not the solution to the indoor pollution".  I saw Joe present at a conference a few months ago and he did a great visual demonstration to make his point.  He took a clear glass and put a 1/2" of coffee at the bottom.  The coffee represents the pollution. 
A bit of coffee to represent a pollutant in your house's air.

Next, he poured clean water on top till the glass was full.  His point is that it takes HUGE amounts of dilution to make the water pure again. 
Did the dilution solve the pollution problem? 

When it comes to specifics about our Texas climate and ventilation rates, there isn't a great amount of information available.  (See this fantastic blog post by Martin Holladay on this topic) Here's my thoughts on what to do if you're in Texas:
  #1  Eliminate as many pollutants as possible.  
  • Use all sealed combustion gas equipment.  Gas furnaces should all be 90%+ efficient units that use PVC vents and a sealed combustion chamber (No metal flue should be present).  Water heaters should be mounted outside if tankless, or High Efficiency Gas (or Heat Pump Electric) if inside the house.  
  • This seems obvious but don't smoke in your house, not so obvious is don't burn candles.  Candles are terrible for Indoor Air Quality (here's a great article from CNN on candle emmissions) 
  • Pay attention to introduced pollutants.  That "new car" smell is bad for you, same goes for furniture, cabinets, carpet, and paint.  Buy cabinets that meet green standards.  I much prefer cabinet cases made from plywood vs particle board.  Ask for plywood that is Formaldehyde free or CARB compliant.  
  • Be careful about cleaning supplies and the chemicals they bring into your house.    
#2  Source Control#3  Ventilation Equipment - BUILD Tight / Ventilate Right 
  •   So, even if we've followed all the steps above we still want to ventilate.  My opinion is that you can cut the ASHRAE 62.2 standard by 50%.  We want some fresh air, but not so much as to pay a huge energy penalty with our hot/humid air coming inside.  Using 50% of ASHRAE 62.2 on the 3000 sf house example above yields a number of 30CFM of fresh air introduced continuously.  My opinion is that the houses I'm building should probably be satisfied with this amount of dilution. 
  Stay Tuned, Next week I'll blog on Good - Better - Best methods for Fresh Air Ventilation...

Best,
Matt Risinger
Risinger Homes is a custom builder and whole house remodeling contractor that specializes in Architect driven and fine craftsmanship work. We utilize an in-house carpentry staff and the latest building science research to build dramatically more efficient, healthy and durable homes.
Be sure to check out my video blog on YouTube

Ventilation Strategies for Texas Homes - Good/Better/Best

$
0
0
PART 1 OF THIS POST IS FOUND HERE TO READ FIRST.
  We've all heard the acronym HVAC - Heating Ventilation and Air Conditioning right?  In general the Ventilation for Texas homes has come from one source, infiltration.  What is infiltration?  This is the air that leaks in around windows & doors.  Most Texas houses have ducts in their unconditioned attic and when the furnace fan kicks on those ducts leak 30-60-90 cfm of air into the attic.  That puts the house into a negative pressure situation and that pressure gets relieved by air leaking in around recessed cans in the ceiling or around vents or outlets on exterior walls.  Texas houses are generally VERY leaky structures.  Infiltration is a very poor way to Ventilate  a home.  This method brings with it all the pollutants from the air source.  Have you ever noticed dust marks on the drywall around ceiling registers?  That's probably dust and fiberglass deposited by attic air leaking in.
  BUILD Tight - Ventilate Right should be our motto.  We want to build the tightest shell possible then introduce fresh air on our terms.  If you're in the Hot/Humid Southern US, it should fresh air that's been filtered and dehumidified. So, let's get down to the strategies to achieve this for our climate zone.  Here's my Good Better Best:
Good: Central Fan Integrated Ventilation with Continuous Exhaust
This is my Risinger Homes standard and this system works very well. 
 
From Building Science Corporation Article Linked Above
Aprilaire controller set for 10 min per hour of fresh air for this house.
Better:  Good System Plus Ventilating Dehumidifer
This is the same system as above but adds an Ultra-Aire Ventilating Dehumidifer to the HVAC system (instead of the portable plug-in model in the good system).  The fresh air pipe goes to the Dehum first then to the return side of the furnace for distribution.  This is really the premier system in terms of comfort for a house in our hot/humid climate zone.  This system is a bit more expensive but is vastly more comfortable for my clients than any house they've lived in before.  See this video for an overview of a house with an Ultra-Aire XT150 installed.

Ventilation piped to the Dehum first.  I'm with Architect Eric MacInerney in a house we built with Heimsath Architects. 
Best:  Better System Plus the Addition of a ERV & HEPA filtration
In this system we un-couple the Dehumidifier and the ERV so they are separate and fully independent ducted systems not connected to the furnace.  This system has several advantages.  The ERV is able to move some of the moisture (energy) between the incoming/outgoing air streams so the fresh air is dehumidified before entering the house.  The ERV has a small efficient fan to bring in outside air and exhaust stale air.  The ERV has separate controls and can have a carbon/particle filter to remove pollen & ozone before entering the house.  HEPA filtration is also easy to add to the ERV if necessitated by clients with Asthma or Compromised Immunity.

Courtesy of Building Science Corporation Article "Read This Before you Ventilate"

You will notice that in all three ventilation strategies there is a supplimental dehumidification component.  I found this interesting exerp from a Building America Ventilation Guide in relation to our Humid/Hot climate and the ASHRAE 62.2 Ventilation Standard:
If the target ventilation rate is to be maintained in a humid climate, active dehumidification should be considered. Consider a 2,500 sq.ft., four-bedroom home. The required ventilation rate would be 63 CFM. In a hot-humid climate like Sarasota, Florida, according to the ACCA Manual J Table 1, the outdoor 1% summer design condition is 92°F with a coincidental wet bulb of 79°F. The moisture content of the air is 129 grains per pound of air. A pound of air occupies about 14.3 cubic feet. So our target ventilation will move about 4.4 (63/14.3) pounds of air into the building per minute. Also, with it comes 5,676 (4.4x129) grains of moisture. In an hour, we have transported 340,560 grains of moisture. There is 7,006 grains of moisture in one pound of water (roughly one pint). Thus, the target ventilation will bring in 48 pints or 3 gallons of water during one-hour of operating time; that is equivalent to moving 72 gallons of water through the home in a 24-hour period.

With no active dehumidification, the home accumulates water until the grains per pound of air indoors is equal to the grains per pound of air outdoors. In the Sarasota, Florida, area where the moisture levels are 129 grains per pound of air outdoors, it will be 129 grains per pound indoors. If the home had 8-foot ceilings, it would contain 20,000 cubic feet or about 1,428 pounds of air. At 129 grains per pound, there would be about 26 pints of water in vapor form in the air at all times. If the AC system was oversized and it could easily maintain 75°F with very little run time, the indoor relative humidity would be 98% and the dew point would be 74°F.

The discussion above sounds extreme but if care is not taken to implement a good dehumidification strategy in humid climates, durability issues can result. There is no doubt that ventilation is required; standard construction practices now result in very tight buildings. Without ventilation, there would be no way to remove indoor pollutants. However, we must understand that when we move outdoor air through the building to ventilate to remove pollutants, in humid climates we are also moving water through the building at the same time. A dehumidification strategy should go hand in hand with the selected ventilation strategy.

Thanks for reading this pretty geeky post!  I also want to thank Joe Lstiburek and the good folks at Building Science Corporation who have some amazing building science research all posted free for the world to learn.  I wish you the best in your building endeavors. 
Remember BUILT Tight - Ventilate Right!
Best,
Matt Risinger
Risinger Homes is a custom builder and whole house remodeling contractor that specializes in Architect driven and fine craftsmanship work. We utilize an in-house carpentry staff and the latest building science research to build dramatically more efficient, healthy and durable homes.
Be sure to check out my video blog on YouTube

Texas HVAC Best Practice Videos

$
0
0
If you've followed my blog you probably know that I'm a major HVAC geek.  This is one of my favorite topics to blog about, so I put together a playlist of HVAC Best Practice videos.  The first one on the playlist I shot in the attic of a brand new house's attic yesterday.  I got a bit crazy with the title... Hit play below, you'll see.


  Best,
Matt Risinger

Risinger Homes is a custom builder and whole house remodeling contractor that specializes in Architect driven and fine craftsmanship work. We utilize an in-house carpentry staff and the latest building science research to build dramatically more efficient, healthy and durable homes.
Be sure to check out my video blog on YouTube.  

Free garage refrigerator?

$
0
0
  I found this link to Energy Star's website pretty interesting and thought I'd share it.  It's a online calculator to show how much electricity your old garage fridge/freezer is using.
  This calculator makes a very good case for buying a new Energy Star labeled fridge vs a used 10+ year old fridge off Craigslist.  My neighbor has a circa 1991 Side By Side fridge and according to this it's costing $183/year in electricty vs a new energy star model that would consume $58/year.  Replacing that fridge would save over $1200 in electricity over the next 10 years!  I paid about $800 for my second fridge, but thought about a used model off Craigslist.  Lets run the math here:
$800 New Fridge
-$150 (what I might have paid for a used one)
=$650 
(-$125 annual energy costs with the new one vs an old fridge)
650/125=5.2
=  Factoring in Energy Costs, my new fridge is free in 5.2 years compared to buying used.

I bought this basic white Whirlpool model and it's been fantastic.  I love having another fridge, and after seeing this online calculator I'm so glad I ended up buying a new one. 
Best,
Matt Risinger

Risinger Homes is a custom builder and whole house remodeling contractor that specializes in Architect driven and fine craftsmanship work. We utilize an in-house carpentry staff and the latest building science research to build dramatically more efficient, healthy and durable homes.
Be sure to check out my video blog on YouTube.  


How to Interview an Architect for a High Performance BUILD

$
0
0
I read this terrific post on GreenBuildingAdvisor.com yesterday by one of my favorite bloggers Martin Holladay.  In that post he gives a great summary of the basics of Green Building (and Building Science), and he gives some tips to people who are interviewing Architects and Builders to build their dream house.  With Mr. Holladay's permission here are his Architect questions from the article linked above:
Questions for your designer or architect
Before you choose a designer or architect, ask the candidates a few questions:

  • What makes a house green? (A designer who mentions things like “keeping the house small” and “keeping energy bills low” is on the right track. A designer whose first answer is “choosing green materials” may not be the one you want to hire.)
  • What design elements contribute to energy savings? (Good answers include “paying attention to airtightness” and “making sure that the walls and ceilings are well insulated.” You don’t want to hear, “Choosing a furnace or air conditioner with a high efficiency rating.”)
  • When you draw plans, do you indicate the location of a home’s air barrier? (If the designer says “yes,” that’s a very good sign. A designer who says “no” may be a good designer, but he or she will probably require some hand-holding and education.)
  I did a similar post on the AIA's Top 20 Architect interview questions about a year ago at this linkThese three from Mr. Holladay are a great starting point on interviewing an Architect for a High Performance design, but here's a few more off the top of my head. 
Matt's Questions for Architect Interviews:
  • If one of my building goals is to build a house that's dramatically more energy efficient than a standard home, how can you help me get there?  (I would look for a response that shows past experiences with High Performance houses, maybe past ratings with a local Green Building council, or a general interest in building better homes that the status quo.)  
  • How do you see your design relating to the long term durability of my house? (In my opinion, a well designed house will be well maintained.  Ugly houses or cutting edge houses tend to get torn down in X number of years, while pretty or architectually significant houses get remodeled) 
  • How have you studied Green Design and/or the principals of Building Science?  (Remember that it's only been recently that Architecture schools have focused on Green Building including Energy Efficiency, look for a response that shows continued education & interest in Efficient, Durable, Heathy homes.)
  •  Tell me about a past design of yours that had a problem, and how you've used that failure to design differently?  (This is a tough question, but I believe that an honest answer about a mistake can show alot about someone's character.  This question also speaks to my interview style of staying away from hypothetical questions.  Ask questions that require a response of: Situation, Action you took, and Result of those actions.)

EEBA "Houses that Work" Seminar Notes

$
0
0
  I would like to welcome guest blogger Ben Broughton to you today.  I hired Ben as a new Project Manager for Risinger Homes last month and as part of his training he attended an all day EEBA Building Science session in Houston.  I'm super blessed to have Ben on my staff as he has an amazing background.  He got his Masters in Construction Science & Management from Texas State and worked previously for SpawGlass doing super complicated commercial projects.  Ben's experience, education, and sharp problem solving skills will be a huge benefit to me as I continue towards my goal of being the best Builder in Austin, TX.
  Ben wrote today's post which is his notes and thoughts from the "Houses that Work" training.  As an aside, I first attended this same program 11 years ago in Portland, OR and that was one of my first introductions to Building Science taught by Mark LaLiberte at that time.  Here's Ben's notes:

-->
Anyone who regularly reads Matt’s blog will know how highly he regards the science taught by the folks at the Energy and Environmental Building Alliance (EEBA).  If you ever get the chance to attend one of their seminars, especially the one entitled “Houses that Work,” you will begin to understand Matt’s passion for EEBA.  I was fortunate enough to participate in the Houses That Work seminar recently held in Houston and want to share some of the high points that made their way into my notebook.

Three Critical things to pay attention to as we build increasingly airtight homes:
-Combustion dangers (burning gas in airtight house)
-Water infiltration (houses can’t handle it like they used to because they don’t dry well.)
-Indoor Air Quality (chemical fumes, etc…)

Ergo: ‘Build tight but ventilate right”

HERS Scores (Home Energy Rating) – Scale of 100-0. 
100 = Energy consumption of a standard American Building built to current “code”.  0 = no net purchased energy, a netzero home.
-A great goal to shoot for as a builder is HERS score of 40 by 2020 and 0 by 2030.
(SIDE NOTE:  The remodel Risinger Homes just finished scored a HERS 45 with no renewables)

Average house expenditures on energy:
Cooling 35%
Heating 20%
Appliances 25% (including lighting and general)
Hot water 20%

Energy waste in a HERS 100 House
Ducts in unconditioned space 23%
Windows 23%
Internal (lights, body heat) 22%
Walls 15%
Attics 8%
Air Leakage 5%
Edge of foundation 5%

Start with the big sources first.  Move ducts to conditioned space and go to a HERS 80.

1 ton of A/c removes 12,000 BTU of heat per hour.

Heat flow (BTUs) = (Exposed area  x  Temperature difference)/R-value

Ex: R20 insulation in attic, 1000 sqft of ceiling, 115 degrees outside, 75 degrees inside home

[1000  x  (115-75)]/20 = 2,000 BTUs lost per hour which is  almost 1/5 th of a ton of A/C every hour.

Duct work run in unconditioned space:  300 sqft of duct surface, R6 insulation on ducts, 135 degrees in attic, 70 degrees in house.  = 1/3 of a ton of a/c loss just to heat flow not counting duct leakage.

Cubic Feet per Minute of airflow needed: 
CFM = (# of bedrooms) x 7.5 x (0.01 x Conditioned sqft).

Radiant Barriers need an airspace to work.  If you spray foam onto the bottom of roof deck with a radiant barrier plywood you would need air space between roof deck and the foam in order for that radiant barrier to work. 

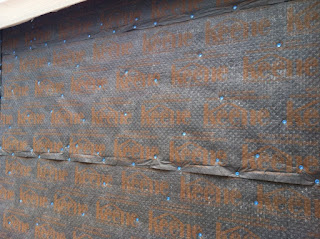
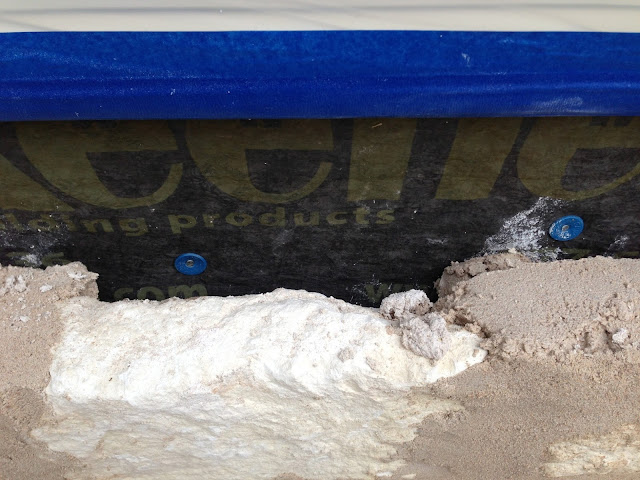
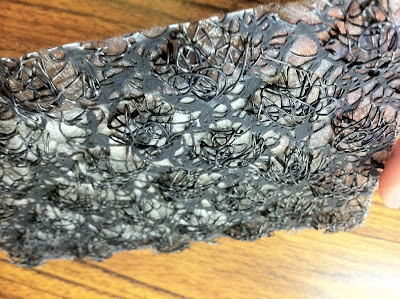
EEBA research:  Houses don’t dry well b/c they are so tight.  If 1% of water from a rain event gets behind weather barrier we are ok.  If 3% gets behind weather barrier the house molds in 90 hours and falls apart in 1 year.  That is why rain screens are so crucial behind cladding.

Capillary action in wood can lift water 300 ft, in concrete 1000 ft.  that is why capillary breaks are so important.

When tackling water infiltration, air flow is much more important than diffusion if you have to attack only one.  With an air leak in your home, 1 ¾ gallons of water can enter in two weeks as vapor.  By diffusion, only 11 oz of water will enter in 6 summer months.

A home with 70 degree F air with a relative humidity of 55% with not feel as comfortable as a house with 75 degree F air at 40% relative humidity.  Everyone thinks they want more HVAC tonnage to get the air colder but what we need is dehumidifiers.  (Matt loves to talk about this!)

Roof slope must shed water first and foremost.  With the trend toward very cut up roofs we need to be sure to understand the path of water so we aren’t dumping onto windows, penetrations, etc... 

Slope grade away from house at 5%

Venting a house’s cladding is important if it is in an environment that sees > 20” of rain per year.  Austin’s annual rainfall is 32.15” over the last 30 years. 

Fiberglass Insulation:  We want all six sides of batt material to be against airtight material such as framing or gypsum wall board.  (This is why we don’t use or recommend batt insulation.  Install needs to be “perfect” to achieve stated R Value)

2012 Energy codes on windows in Texas:

U-value = .40  (Many windows sold today don’t make this number)
SHGC = .25  (specify Cardinal LoE 366 glass and you’ll make this no problem)

Normal 2x4 wall with R13 insulation installed perfectly is R10 (considering the whole wall)

A 2x6 wall no windows and no doors has a cavity R value of 21.  Studs have an R value of 8, so the wall unit has an R value of 14.4 when installed perfectly

A 2x6 wall with R-21 Blown cavity and R5 continuous rigid foam on the exterior is R 20.05

A 2x6 wall with R-21 Blown cavity and R10 continuous rigid foam on the exterior is R 25.05

Low e windows example:
House #1:  U=.65  AND SHGC = .65
You will need a 4 ton A/C unit in the house

Same House Different Windows:  U=.32 AND SHGC = .32
You will need a 2.5 ton A/C unit

84% of high SEER units set up wrong.  Refrigerant charge verification very important.

Measure airflow at all registers, put it in contract that HVAC sub will balance system based on third party duct flow test of installed system.

If a Manual J is done right an HVAC sub could say “most HVAC contractors would put in two 4 ton units, I’ll put in a 3 and a 2 and guarantee comfort and throw in a dehumidifier for free with the cost savings.”


One of the most exciting lessons I took away from the seminar is the vast array of tools at our disposal to increase comfort in our homes.  A comfortable house is a healthy and happy house.  Modern architecture has provided sublime structures that take one’s breath away but one complaint against this school of design is it tends to come off as uninviting, cold, uncomfortable.  The result of this has been a backlash against Modern architecture because home owners don’t want to give up comfort even in the pursuit of beauty.  Comfort is crucial.  As a quick aside, the concept of Modern architecture has unfairly received the criticism of uncomfortable.  We have built and seen many homes classified as Modern that are warm, inviting and comfortable.  We have the privilege to work with architects in Austin, Tx who are gifted at achieving both ends, continually proving that one does not have to sacrifice comfort for architectural splendor.

Comforts is key to our homes and as a society our tolerances for comfort are narrowing.  As our ability to control the internal environment of a house improves, our expectations for comfort grow alongside.  There was a time in the 1800s when a “comfortable” house meant one that kept the animals out, the rain off and provided some shade in the middle of a sweltering summer day.  I doubt any of us would consider such accommodations as “comfortable” today.

The question then arises, “What will ‘comfortable’ mean in twenty years?”  First let’s talk about one aspect of how the average home in the US is currently made “comfortable.”  In a hot and humid climate like we have in Austin, large HVAC systems are the name of the game.  It is not unusual to see two 5 ton units on a house.  These units will have single speed condensers and the result is, for most of the year the units will come on, blow full speed for a minute or two and then shut off.  Such activity equals vast swings from too cold (as a blizzard of air hits us) to too humid and hot as we wait for the unit to blow again.  Instead of this setup, a variable speed or even two speed condenser alongside a dehumidifier would keep the conditioned space much more comfortable and especially more consistently comfortable.  A house at 70 F with 65% humidity will never feel as comfortable to the occupants as a house that is 75 F at 45% humidity.  Despite this fact, current setups see the temperature of the conditioned air as the most important metric for design.  It reminds me of my high school days when I measured the power of a motor by cubic inches alone.  I didn’t care about other performance contributors such as exhaust capacity as long as it had a big number by the motor.  Now I am a more sophisticated consumer and analyze my vehicles on across multiple dimensions resulting in much better performance.  In the same way we must expand our matrix to evaluate HVAC criteria.

Matt has been on the forefront of building homes that utilize the innovative science that EEBA and other pioneering groups have developed.  Constructing high performing envelopes is a trademark of Matt’s company but where Matt really gets excited is when he is detailing HVAC systems.  After attending this EEBA seminar I better understand why.  “Comfort” as the average home owner defines it is only called such because he has not experienced what a well designed, innovative system can offer.  I predict it will not be too long before we look at current home environments with a similar head shake to when we look at an 1800’s definition. 

Ben Broughton with his unofficial Risinger Homes uniform "Black Shirt w a Logo"


The "Lexus" of HVAC - Mitsubishi VRF System overview

$
0
0
I'm a huge HVAC geek and I'm really excited to show off my first house with Mitsubishi's Variable Refrigerant Flow technology. The video was shot at a new house I built with Architect Scott Ginder of Dick Clark Architecture and it has the most advanced HVAC system I've installed to date. Most Heat Pumps are single speed meaning they are 100% ON or 100% OFF and they are sized for the 99 degree days. This results in a blast of cold air and very short run times most of the year.  In recent years manufacturers have pushed two stage equipment which can run at 60% or 100%.  The Mitsubishi system I'm reviewing in the video uses VRF technology to vary the capacity from 15% to 100% in 1% increments.  This gives ultimate comfort and efficiency and is why I call this the "Lexus" of HVAC systems!

Join me as I interview local Building Science expert Kristof Irwin (he designed the system for me) to discuss Mitsubishi VRF. This is a long video, but it's worth your time if you are building or remodeling and want to hear about the best HVAC system available in today's marketplace.


-Matt Risinger

Risinger Homes is a custom builder and whole house remodeling contractor that specializes in Architect driven and fine craftsmanship work. We utilize an in-house carpentry staff and the latest building science research to build dramatically more efficient, healthy and durable homes.
Be sure to check out my video blog on YouTube.  

Reclaimed Wide Plank Pine Floors from Old Beams - plus Bona Traffic Satin

$
0
0
I'm a huge fan of true sand & finish in place hardwood floors.  I hear all the sales pitches about the durability of pre-finished floors and their 200 year warranties (kidding), but I just don't buy it.  I think a "real" custom home should have a true hardwood floor.  What else inside the house is going to have value in 75 years?  Most likely the house you build today will get a major kitchen remodel inside of 30 years and within 50 all the windows/siding will be replaced, by the time you hit 75 years old a new owner of this house will gut it down to the studs and upgrade ALL the systems.  However, the one thing that has enduring value is a 3/4" solid hardwood floor.  I regularly pull out hardwoods from 80 year old houses to store during the remodel phase only to re-install those boards 6 months later and when they get resanded/finished they look like a million dollars! 
  Anyhow, the point of this post is to show off the reclaimed beams that a local hardwood supplier found in a warehouse in Houston and milled into amazing wide plank pine floors for this Springdale farms house I finished a while back. 
My client Glen and Paula with the beams before milling
   
The milled boards arriving on the job post drywall. 
We generally install hardwoods unfinished post-sheetrock install so that we can put all trim & cabinets on top without additional shoe or scribe moldings. 

All wood floors are installed sanded/sealed prior to trim install.


One of my ace finish carpenters installing 5/4 pine treads milled from the same beams.

Shaker style built up newel and pickets. 
Sanded and one coat of sealer.

We used some 1/2" rough sawn boards from the same beams to do some ceilings too. 
FInished Floors with Bona Traffic Satin


Wide plank pine gives this new farmhouse the feel of a 100 year old house!

Hardwoods in the kitchen are so nice underfoot and glasses don't break if dropped. 

Wood stairs are my favorite. Not many craftsmen can execute these with precision anymore. 

This is the upstairs landing.  The wood ceiling add warmth that is hard to achieve with drywall. 


Front view of this modern Farmhouse. 


The Bona Traffic Satin floor finish has been terrific on this floor, but keep in mind that ANY pine floor is going to be relatively soft compared to an oak floor.  This house in particular was going for the "instant old" look so those dents are scratches that come up with farmlife make the floor more beautiful.  My clients have absolutely loved this floor!  I'd also like to give some heavy praise to Eric Rauser the Architect on this project.  Eric is an amazing guy and this house is a testament to his design talent and dedication to building homes that will stand the tests of time. 
  Thanks reading my blog and if you are considering hardwood floors for your new BUILD or remodel please consider true sanded & site finished hardwoods.  I believe this is the one upgrade that will last the life of your house and beyond.  To see more of this house visit this gallery on Houzz.  -Matt Risinger

Risinger Homes is a custom builder and whole house remodeling contractor that specializes in Architect driven and fine craftsmanship work. We utilize an in-house carpentry staff and the latest building science research to build dramatically more efficient, healthy and durable homes.
Be sure to check out my video blog on YouTube.  

Water Heater Options For A Large Custom Home - Tankless vs Tank vs Heat Pump Water Heater

$
0
0
Heating and cooling may account for the two greatest utility loads in our homes, but water heating is not far behind in third.  As a builder who cares about the efficiency & reliability of our buildings, we find ourselves consistently having conversations about which water heating units are the best fit for our client’s needs. There is certainly not one end-all-be-all answer and there are plenty of variables to take into consideration when choosing what unit and system is right for you or your client. Considering the spectrum of options on the market today, we’d like to take advantage of one of our current projects as a case study.

If you’ve been following this blog or my YouTube channel you’ve seen that we’ve reviewed and posted about a Rheem HP-50 Hybrid Heat Pump (and anAirTap ATI 66), a Vertex High Efficiency Gas Condensing unit and  a Rinnai Tankless unit. We’ve liked and used each of these types of water heaters for different reasons and in different contexts and are continuing to learn not only how well these operate over time, but how well they are meeting the specific needs of the residents they serve. 

For this case study, the same three types mentioned above play a role (scroll to the end if you just want a numbers comparison of our three unit choices), starting with three(3!) Rinnai RU98i Tankless units currently slated for the project. To set the stage better we have a 7,000 square foot custom home for a family of 5 (2 Adults, 3 Teens), with the original intent behind the 3 tankless units being to keep the runs from unit to end user as short as possible and serve 3 zones - 1. Master Bath/Bed 2. Kitchen/Laundry/Bathroom and 3. the kid’s bathrooms. Although these are great units, with much to like, we decided to do a little research and look into other water heating options that we could then present to the client. Our main concern in initiating the research into alternative water options had to do with one particular obstacle with the tankless units - Maintenance. 

The first maintenance obstacle we are predicting for these tankless units has to do with the hard water here in Austin. These units are supposed to require service once every 12-18 or so months, but we’ve found this is too lenient for our water here and that service is definitely necessary every 12 months. Our experience is showing that the tankless boilers can have scale build up at a relatively rapid pace, and subsequently effect or clog a thermostatic valve cartridge or other filters found at fixture locations. The 199,000 Btu burners on these units are no doubt impressive at only 1,000 Btu under commercial boiler grade, but the high heat in combination with the amount of surface area and small diameter of the copper piping relative to a traditional ‘boiler pot’ of a tank heater, contribute to this unfortunate scale build up. That said we have seen but have yet to use or test the Rinnai scale control system (basically a mini water softener).


Tankless Water Heater Scale Clogging Aerators after 24 Mo without a flush.

The second maintenance obstacle is of a different nature and comes out of a concern for resident privacy. Each of the three units is located on the interior of the residence within tricky, tight closet space, one of which is in the master bedroom. In order to service and flush these units you need about a five-gallon bucket of an industrial strength vinegar cleaner, a sump pump and the usual basic tools etc.  This presents a cleanliness issue, with the potential for overspray, leakage and so forth, but more importantly an invasion of the most intimate and private space in the house - which makes us uncomfortable and most likely the resident too. 

We’ve seen that these units are excellent choices in certain contexts and although they are a good choice for this residence from the perspective of efficiently, meeting the high hot water demand, effective piping/zoning design and maximizing interior space; we think there are two alternatives that will allow us to avoid our maintenance concern and still meet the needs of the residents. 

CURRENT PLAN
Three Rinnai RU98i Tankless Units

1.Master Bed/Bath     2. Kitchen/Laundry/Bath    3. Kids Bathrooms


PROPOSED ALTERNATIVE A
One 50 Gallon Vertex 100 Gas (Propane) Condensing Unit +2 Metlund Demand Pumps


PROPOSED ALTERNATIVE B
Two 80gal Stiebel Eltron Accelera 300 Hybrid Heat Pumps + 2 Metlund D’mand Pumps
(AirGenerate AirTap ATI 80 also worth looking at)


In both alternative A or B, the water heating units would be placed in the garage storage room, which immediately presents a different set of concerns as we lose the efficiency that came with the proximity of multiple tankless units throughout the house. The layout of hot-water piping can be an oft overlooked factor in gaining the most out of your heating units. Gary Klein has written a great article on just this subject in the March 2013 issue of JLC and it is well worth a read as we won’t get into the details here. That said, our primary concern by proposing tank units located in the garage was time-to-tap, standby heat loss and water waste given that the distance to the kitchen and master bathroom (the two anticipated high demand locations) are 80 and 170 feet respectively from the unit(s). We’ve used Metlund D’mand Pumps  (link to youtube video) on other projects and we think they’d be a great solution at each of the aforementioned locations. For anyone who may not be as familiar with these, they are referred to as ‘recirculation’ pumps, but we refer to them as recharging pumps. Placed at the desired fixture points, the pumps discharge the cold or cooled water from the pipes back to the water heater, meanwhile charging the system with hot water, all via the push of a button, or in the case of our master bathroom, a motion sensor. The pumps run (very quietly) for a few seconds and shut off automatically when the pump senses the water is hot.  Although these pumps will add an additional cost, they are vital in such long branch runs if you want fast hot water and not waste water down the drain waiting on hot. 

But let’s get to the good stuff - the two alternative water heating units. Why did we pick these two? 


A.O. SMITH VERTEX 100 POWER DIRECT CONDENSING WATER HEATER

We are proposing the Vertex as the more ‘standard’ option of the three possibilities. Our client’s site does not have accessibility to natural gas, so this and the Rinnai Tankless options would be utilizing Propane as their fuel source. This is not an inexpensive water heater (approx $2200), but we’re impressed with what these units can do. We’ve made a few posts about this exact unit in the past, with another video pending, but the main things to note about this unit are:

  • Lowest up-front cost of the three proposed units, with 1 tank being plenty sufficient to do the job (keep in mind that your average house of this size would have 2-3 water heaters)
  • Only requires inexpensive PVC venting for intake and exhaust and power vented (this unit it easy to put inside the tight conditioned envelope)
  • Impressive 96% thermal efficiency (compared to average of 60-75% of standard units)
  • High first-hour delivery rate - 164 gallons
  • Fast recovery rate - 129 (4.3 gal/min) = ability to run continuous hot water
  • Simple and user-friendly LCD interface
  • Single tank that can be hidden away easily
* Important to note that a condensate drain is required for these units
That’s a brief look at the Vertex, and it’s beast, that you couldn’t really go wrong with, especially if you have natural gas. That said, we don’t have natural gas for this house and  we’re excited about how good of a fit the Hybrid Heat-Pump units could be. 

STIEBEL ELTRON ACCELERA 300 HEAT-PUMP WATER HEATER

 There’s a lot of good research and testing being done on these units and there is some great literature we’ve listed at the end of this post that we encourage you to check out if you want to get a little more in-depth understanding of the technology and performance of HPWH units. For those who might not be familiar with how this type of hot water works, they operate much in the same way as your air-conditioner or refrigerator compressor does, but instead of transferring heat away from the unit like an air conditioner, it extracts the warmth from the ambient air and transfers the heat to the water in the tank. This results in a thermal efficiency of about 250% or a 2.5 EF.  Martin Holladay notes in the article listed at the end of this post that the American Council for an Energy-Efficient Economy (ACEEE) has calculated that the electric heat-pump water heater has the lowest life-cycle cost compared to other units ($4125 over 13 years - for one unit), and they are also his personal recommendation if 1. natural gas is not available and 2. you have good location to install a heat-pump water heater. (See this video I shot about the AirTap ATI66 inside a Texas House)

Let’s get the main downsides out of the way first and why we’ve decided these are outdone by the benefits and strategic planning.

  • Expensive units = greater initial cost
  • Slow recovery rate at 8gal/hour after first-hour delivery
  • These can produce more noise than a standard unit
  • Placement is critical to gain full efficiency
  • need a condensate drain

These units can be used in just about any climate, but they are incredibly well-suited for our climate here in Austin. You need a minimum ambient air temperature of 42F for these units to operate but their coefficient of performance (COP) is directly tied to the air temperature. To put it in perspective, the COP at 42F is 2.0, but can increases to an impressive 7.0 at 108F.

With Austin’s 2012 annual average air temperature at 71.7F (http://www.srh.noaa.gov/images/ewx/aus/attmontemp.pdf), and by locating it in the unconditioned garage space we should have no problem getting a very high efficiency from this sort of unit year round. One of the best side benefits of these units is the production of cool air and dehumidification. This can be beneficial in an interior space, but also in a space such as the garage, (especially if there is workshop space allotted) which can often become a hot-box in our climate. The temperature factor, when combined with the sound level and the need for this particular to be placed in an area with 500 cubic feet of air space, makes the garage an excellent location for this unit. 


What to do about the slow recovery rate though? The general and consistent recommendation is to go with the bigger tank. We’re actually proposing two of the larger 78 gallon tanks (these clients have three teenagers at home). The goal is to have the Heat-Pump units operating in Heat-Pump only mode. Typically you have the option to set these in High Efficiency mode (heat-pump only, my preferred setting), Hybrid Mode (Electric heating element kicks in on this unit after delivery of 50gal) or Electric only mode. High efficiency mode is of course just that, and in order to maintain that efficiency and utilize solely the heat-pump for recovery, a larger tank is needed to keep up, especially in times of high demand, and especially for a family of 5. Additionally, you also gain better performance, increased efficiency and a decreased standby loss within the tank. If you were a family of two, the large tank might be unnecessary, but for more than two persons as is our case, a larger tank, or a second tank becomes vital. This way, we are able to guarantee and achieve the highest possible water heating efficiency and volume in heat-pump only mode, whilst not compromising or effecting the capacity to meet the resident’s demands of hot water in any given situation. 

Although this system has an up-front cost not far behind the original tankless proposal, the operational costs over a ten year period are almost half according to our estimates, and the efficiency is by far the highest. The electricity costs for the Heat-Pump units is somewhat hard to anticipate on existing available data, but the important factor is that we are wanting/needing to run the tanks in High Efficiency mode only. As you can see in the chart below, the playing field levels out in terms of long-term cost for the Vertex and the Heat-Pump options over a 10yr period.


*based on Austin’s Oct-May rate for 1001-1500 kWh usage - and because this was a general estimation, we decided to multiply it by 150% to give some cushion in case we were on the low side
** (based on constant of 41045 Btu/day and 12.03kWh - the avg daily energy use of a gas or electric unit respectively                                                                                                                                    http://energy.gov/energysaver/articles/estimating-costs-and-efficiency-storage-demand-and-heat-pump-water-heaters


SO, WHAT'S IT GONNA BE?

Our recommendation is definitely not the Tankless at this point. Concern over the maintenance combined with the projected long-term cost make it no-brainer for us to narrow it down to the other two options. The Heat-Pump option edges out the Vertex for us despite the comprable 10yr cost comparison. What sells us on the Heat-Pump over the Vertex is namely: 1. The potential to cool the garage to a very temperate level solely with this unit (it should deliver about a ton of cooling) and 2. The future possibility of tying the unit into solar options, which creates greater potential for a net-zero home. So, even though the Heat-Pump option requires two units, which means more space, and occupation of open space, we like the additional side-benefits enough to try and make a case for it. That said, our second recommendation, the Vertex is probably what will be installed, and we do not see this as ‘settling’ by any means. Propane is already being used in the house and so it makes a lot of sense to go this direction.  The Vertex is super efficient and provides a nearly limitless supply of hot water and a smaller foot print for the tank, which can also be hidden away easily in the garage.


Thanks for reading this lengthy case stydt, and in case you want to geek out some more on water heaters here are some good sources that we found quite helpful.


______________________________________________________________________

WATER HEATERS - GENERAL OVERVIEW
Holladay, Martin. (2013, June/July). The Water Heater Payoff. Fine Homebuilding. 236, 62-65.

HEAT-PUMP HOT WATER HEATERS
Holladay, Martin. “Heat-Pump Water Heaters Come of Age.” GreenBuildingAdvisor.com. 13 April 2012.

[CARB 2012] Shapiro, C., Puttagunta, S., Owens, D. (Steven Winter Associates, Inc. 2012). Measure Guideline: Heat-Pump Water Heaters in New and Existing Homes. U.S. Department of Energy, Building America.

[CARB 2011] Puttagunta, Srikanth. (Steven Winter Associates, Inc. 2011). Measure Performance of Advanced Water Heating Strategies - Heat-Pump Water Heater. U.S. Department of Energy, Building America.


Special Thanks to my Summer Intern Mark Epler who compiled and wrote this article for me.  Mark is pursuing his Masters in Architecture at University of Texas at Austin.  


AirGenerate AirTap ATI66 Heat Pump Water Heater Review

$
0
0
  I've been recommending Heat Pump Water Heaters to all my clients without Natural Gas service to their houses.  In the past, I've installed Rheem and AOSmith's electric HPWH's but I've not installed one inside the conditioned space of the house, until now! 
 I found this AirGenerate model ATI66 about a year ago and was immediately impressed by the stats on the unit, but the MOST important feature to me is the ability to duct air in/out of the heat pump on the top of this water heater!
This is not a small water heater at 69" tall and 25" in diameter. 

You are going to need a good space to utilize this large HPWH inside your house. 
 This model uses a 9000 Btu heat pump to gather heat out of the air and moves that heat into the 66 gallon tank below.  A standard electric water heater has an EF rating of 1.0, but this unit's EF rating is 2.25.  That means it's using less than 1/2 the electricity to heat the water as a standard electric unit.  If you are building in the hot/humid Southern US the byproducts of this efficient unit are cool & dehumidified air!  That's why most HPWH's say you need a rather large 10x10 room to locate this heater.  BUT, with a ducted unit we can use a smaller closet and direct that cool exhaust somewhere useful!
Input and Exhaust ports.  Genius!


This ATI66 is inside a foyer closet, you can see the Panasonic ERV directly above it dumping hot air into the intake.
  Check out this video to get my full review:

Couple last comments on HPWH's in general:
  1. If you have more than 2 people in your house I'd recommend buying bigger than a 50 gallon tank
  2. Set yours to ECON mode so the electric resistance heater won't fire up.  That electric backup coil severely limits your savings with this heat pump water heater.
  3. Check and clean your filters every 60 days!  These need air flow to be efficient.
  4. Don't cheap out and get a standard electric unit, you WILL save big money in the long run with a heat pump water heater.   
Thanks for reading my blog! 
-Matt Risinger

Risinger Homes is a custom builder and whole house remodeling contractor that specializes in Architect driven and fine craftsmanship work. We utilize an in-house carpentry staff and the latest building science research to build dramatically more efficient, healthy and durable homes.
Be sure to check out my video blog on YouTube. 

Drying Wet Framing - Journal of Light Construction Article by Matt Risinger - June 2013

$
0
0
Wet Framing?  Here's what to do...
 I had my second published article appear in the Journal of Light Construction and I thought I'd share it with my blog readers.  Enjoy!  -Matt Risinger


CREE CR6 LED Recessed Light Review

$
0
0
We recently posted a video about the Cree CR6 LED downlighting used in a house we recently completed with Eric McInerney of Heismath Architects. Eric is the owner and architect on the house and he provided us with some great insight as to why they decided on these particular fixtures and I encourage you to check that video out if you haven’t done so already. The Cree CR series is a great product line that has caught our attention as of late and as such, we thought we’d provide a little more detailed breakdown on the specs and why we think it is worth checking out.  First, here's the video:


The Cree CR LED series is comprised of two versions - the 4-inch and the 6-inch. Both of these come in either ‘TrueWhite’ or ‘Full Definition’ (TrueWhite has a much better CRI rating*) The specifications of each are listed below for your comparison, but for us, we prefer the 6-inch for the increased 800 Lumens output. Part of what makes these lights so fantastic in our opinion is that unless you were told that they were LED lights, you probably would not otherwise have differentiated them from your typical halogen or incandescent bulbs. In the past, it has been hard to compare LED lights to the industry standards simply due to the fact that an LED was blatantly ‘other’ in it’s light qualities. The playing field is leveling out though and we really like the Cree CR6 for its qualities of brightness, color accuracy, long life, low power usage, dimmability, affordability and easy installation.

Here are the basic options of the Cree CR LED downlighting series:

The CR6-800L that we have a bias towards would be the equivalent or replacement for a 90W BR (Bulged Reflector) Incandescent bulb or a 26W standard CFL. So, not only are you beating out a typical Incandescent bulb as would be expected, but you are cutting the energy usage of a compact fluorescent in half too. When you take this into consideration with the other specifications, this is an all-around winner in our book. The CR6-800L TrueWhite will cost you about $60 each, or closer to $50-$55 if you buy in larger quantities, whilst the CR6-625L is an Amazon Prime product and comes in at $41.50. Our friend, Eric McInerney has not had to replace any of his Cree CR6 bulbs in over 2 years now, so the initial price will pay off given how long they last in conjunction with the energy saved, not to mention the easy and affordable installation you can use for these.

Cree has developed these bulbs to efficiently and economically integrate into new construction or for retrofitting. If you already have 6” recessed lights, it’s an extremely simple swap, as you can see here in the Cree installation video. In the case of new construction, you can buy a standard 6” housing unit at Home Depot for $10 and it’s a basic 1-2-3 install with a bulb replacement process that is no more difficult than your standard bulb swap. Cree specifies other housing options for their CR series, but for a standard and economical option, this is a great way to go.


*CRI, CCT and Color Temperature Explained

Color Temperature: This is usually measured by the Kelvin Color Temperature Scale, rating light qualities based on color, typically described from cool to warm and quantified in the range of 1,000 to 10,000 Kelvins.

CCT - Color Correlated Temperature: This is a scale used to describe the light qualities of lights that are non-Incandescent, and therefore they cannot replicate the Kelvin Color Temperature Scale, but instead use it as a visual reference. Thus, an LED with a CCT of 2700K is a visual approximation of the correlated Kelvin temperature it most closely imitates.

CRI - Color Rendering Index: Here again, we have an index for non-incandescent radiator based, utilizing a scale up to 100. An incandescent radiator based bulb automatically has a CRI of 100, because this bulb type is the basis for the Kelvin Color Temperature Scale. This means that the CRI index is an indicator of how accurately or how well an alternative light source can replicate an Incandescent Radiator based bulb, or more specifically the Kelvin Color Temperature Scale. A rating of 90+ is quite good and ideal. For example, the Cree CR Full Definition series has a CRI rating of 83, while the CR TrueWhite has a CRI of 90, making it much more desirable.

Here’s a great resource if you want a more detailed and in-depth explanation of Color Temperature and Rendering.

Thanks for reading my blog! 
-Matt Risinger

Risinger Homes is a custom builder and whole house remodeling contractor that specializes in Architect driven and fine craftsmanship work. We utilize an in-house carpentry staff and the latest building science research to build dramatically more efficient, healthy and durable homes.
Be sure to check out my video blog on YouTube

Fall 2013 AIA Austin Homes Tour - 1930's Renovation Before/After Photos

$
0
0
1930's House that was generally in good shape (and not re-muddled)
I recently learned that the house we remodeled with local Architect Hugh Jefferson Randolph was selected to be on the Fall 2013 AIA Austin Homes tour.  This is one of the best homes tours in the Nation and I'm excited to have my 9th house on this tour!  If you are in Austin, TX the weekend of Nov 2-3, 2013 I'd love to have you visit me at this house.


Old photo from the 1980's of a bedroom in this house.  Notice the staining on the wallpaper from window leaks.

Most of the house had 1/2" drywall over the original ship-lap 1x8 pine walls that were originally wallpapered.


Beautiful original 2.25" White Oak Floors.  Notice they laid the floors then built the walls on top.  We saved the floors to re-install later.  

Adding a second story by adding 2' to the ridge height. 

Great collaboration on the job site with Architect Hugh Jefferson Randolph, our clients the Battles, and Eric Rauser.  Notice the Long Leaf Pine siding that was saved to be stripped and re-installed. 

The lead based paint on the doors was stripped and we re-installed them along with the original hardware.

Tons of opportunities presented themselves once we completed demo.  Originally the FP chimney was enclosed but when we saw how beautiful it was crafted it wanted to be uncovered. 
We saved all the interior shiplap pine to re-clad the walls.  I love the rustic pine in contrast to the slick sheetrock.


The Fireplace is such a great feature inside this house. 

Four sided skylight around the FP!

Original 1930's floors reinstalled and looking amazing 80 years later.
I couldn't help but take the cheezy builder in front shot.

Original shipping bill for the lumber off the railway from 1930.

Modern addition on the backside. 

I love this house, it's so beautiful. 

Can you see the modern dormers with three sided glass?

The original Long Leaf Pine siding reinstalled over a rain screen air gap and 1" rigid foam.   
If you'd like to see more of this interesting 1930's remodel I'd love to show you around.  It will be on the AIA Homes Tour this Fall.  I'll be there all weekend so be sure to stop by.
Best,
Matt Risinger

Risinger Homes is a custom builder and whole house remodeling contractor that specializes in Architect driven and fine craftsmanship work. We utilize an in-house carpentry staff and the latest building science research to build dramatically more efficient, healthy and durable homes.
Be sure to check out my video blog on YouTube


11 Builder Interview Questions

$
0
0
  Have you ever observed the research that a college student does when buying a cell phone?  They ask all their friends about their handset, plans, costs, & coverage.  They do all the online research to ensure that their new phone has the features they want, and that Apple doesn’t have a new model arriving soon to make theirs obsolete.  They spend a ton of effort on this decision that will cost them $75/month.   
  Contrast that effort with how quickly some clients choose their builders.  I’m always surprised at the brief effort that some clients spend interviewing or checking the references for a $100,000 or even a $1,000,000+ project. 
  With that in mind let's talk about how to interview.  I fully believe that past performance dictates future behavior, so I recommend staying away from “what if” questions.  Instead use the STAR method.  Ask a question that demands an answer with a past Situation/Task, the Action that was taken to resolve this, and the Results of their actions.  Always steer the interviewee back to real life past situations or tasks.  These past experiences will give you an idea of how they will handle your project. 
Here’s my top 11 questions:
  1. Can you give me an example of when a problem happened on a past project during construction?  What was the situation, what action did you take, and what was the result? 
  2. Tell me about a house you worked on that had a difficult client.  What was the situation, what actions did you take to keep this client happy, and what was the result? 
  3. Give me a specific example of a time when you used good judgement and logic in solving a problem. 
  4. Tell me about a time when you had to go above and beyond the call of duty to get a job done.
  5. Tell me about a time when you had too many things to do and you were required to prioritize tasks.  (Use this question to probe for how they manage their jobs, follow up questions might be: “How do you organize your day?  How do you schedule sub-contractors?)
  6. Tell me about a time when you had to motivate an unwilling sub-contractor or inspector to go your way?
  7. What’s the worst failure you’ve had of a building after a client moved in?  How did you handle it. 
  8. Tell me about a time when you had to fire a sub-contractor.  How was the project affected? 
  9. Tell me about a time when you were able to successfully deal with another person even when that individual may not have personally liked you (or vice-versa).
  10. Tell me about a personal goal you’ve set for yourself that you were able to meet or achieve. 
  11. Tell me about a project that you’ve done where the clients or architect had unrealistic expectations.  How did you meet or change those expectations?
  You can tell a lot about a builder by asking these questions.  These will reveal their problem solving skills, their judgement, their organization, and most of all their integrity when things go wrong.  If you spend the time interviewing with this STAR method my guess is that you’ll find one person/company that really stands out as the clear choice for your project. 
Best,
Matt Risinger - Risinger Homes in Austin, TX

Risinger Homes is a custom builder and whole house remodeling contractor that specializes in Architect driven and fine craftsmanship work. We utilize an in-house carpentry staff and the latest building science research to build dramatically more efficient, healthy and durable homes.
Be sure to check out my video blog on YouTube.

3 Best Practice Deck Tips (including Grace Deck Protector)

$
0
0
3 Tips for Building an Enduring Deck

Since most decks are made of wood, we can of course expect them to rot ... eventually. The average deck, composed of treated lumber joists, beams and posts, will last somewhere between 15-25 years depending on the climate zone it is in and how much water it is tormented by, not to mention how it is built. In many cases it is not the deck boards that rot, but rather the treated lumber framing which is susceptible. There are however some fairly simple ways to extend your deck structure’s life-span to potentially 30-50 years. Doing so allows you to extend or match the endurance of your deck’s structure to those of the deck boards if you are installing exotic woods such as Ipe or Massaranduba, which many of our local architects like to use and which can last into that 40-50yr range. Whether you are using composite deck boards or going all out for Teak, here are three relatively economical and efficient tips to prolong your deck.


TIP #1
SEAL THE JOIST TOPS

One of the main causes of decay in a deck structure comes from the penetration of water into the deck joists via the screw holes. Water works its way through or underneath deck boards into the screw holes, eventually forcing rot to occur (treated lumber or not). Treated lumber is certainly not foolproof and the chemicals in treated lumber do not penetrate 100% of the material, which leaves much of the core of any piece vulnerable. We’ve found that the best product to minimize and deflect water infiltration these points is a product called Grace Vycor Plus Flexible Flashing. This is a self-healing peel and stick product that comes in rolls 75’ long and various widths (4” 6” 9” & 12”), and is an easy, efficient install. A 4” roll, which is mostly what you’ll need runs $27.99 with Amazon Prime shipping free.
Grace Vycor Deck Protector on this 2x10 PT Deck


TIP #2
PROTECT YOUR POST BASES

Just as you do not want any of your deck joists in contact with the grade below it, neither do you want you post bases positioned similarly. This means not encasing it in the concrete, nor allowing it to sit directly in contact with the concrete where it can wick moisture or find itself encased in silt and topsoil after a few good downpours. The goal is to raise the bottom of the post just a couple of inches from the concrete and the soil to reduce it’s contact with organic material and moisture. Fortunately, there are plenty of good products for this important precautionary measure, which is easily and often neglected. On our last project, we used Simpson Strong Tie Z-Max 4x4 Adjustable post base and you can fasten these to your concrete footing with an anchor bolt, Tapcon fastener or a combination of a bolt with an appropriately chosen construction epoxy. This is again, a fairly economical and efficient implementation that can have a far reaching impact on your deck. As you are probably aware of, the endgrain of any wood species is like a bundle of straws and that bundle of cells will literally suck moisture right up and in, which leads us to Tip #3.
I see so many wood posts buried in concrete that rot in under 10 years!  A simple post base easily doubles post life.


TIP#3
SEAL YOUR POST ENDS

Some might think this is over-the-top, but again, it’s a relatively simple and affordable addition to the installation of your treated lumber posts with long-term payoff. This process is a simple brush on application of a product called Seal Krete Multi Surface Acrylic Water Repellent, which should be available from your local building supply store (Home Depot in Austin carries it). When dried this product acts like a cap to your post ends and helps ensure a resistance to water wicking and infiltration. You can think of this as the equivalent of Scotch Guard for you posts. When you follow this tip in conjunction with Tip#2, your posts will be solid and reliable for a very long time.

Here's my video I made of these three tips on two deck projects.


Best,
Matt Risinger - Risinger Homes in Austin, TX

Risinger Homes is a custom builder and whole house remodeling contractor that specializes in Architect driven and fine craftsmanship work. We utilize an in-house carpentry staff and the latest building science research to build dramatically more efficient, healthy and durable homes.
Be sure to check out my video blog on YouTube.


Hidden Medicine Cabinet - It's gigantic!

$
0
0
My finish carpenters love working on hidden doors and this medicine cabinet detail from Architect Scott Ginder with Dick Clark & Associates was a ton of fun to build.  He wanted these white oak framed mirrors to be flush with the tiled wall and not appear to be a medicine cabinet. 
The white oak frames on these med cabinets are flush to the wall and you can't tell there is space behind.
Here's a few shots from under construction:
The poor plumbers had a tough time getting all the pipes for wall mounted faucets in limited space with these deep med cabs. 
You can see the wires for the lights and elecric outlets inside these cavities. 
All completed and ready for the mirrors to be glued on.
 I don't have a good photo of these on the job but the Blum 155 degree hinges needed to have a longer throw than a standard euro hinge. 
Blum 155 degree Protrusion Hinges we used.

His & Hers Giant Medicine cabinets! 
Here's a quick video I shot of these:

Best,
Matt Risinger - Risinger Homes in Austin, TX

Risinger Homes is a custom builder and whole house remodeling contractor that specializes in Architect driven and fine craftsmanship work. We utilize an in-house carpentry staff and the latest building science research to build dramatically more efficient, healthy and durable homes.
Be sure to check out my video blog on YouTube.


Garage AC - Wrong way & Right way Video

$
0
0
  The idea of Air Conditioning in a garage is particularly intriguing to anyone who uses their garage for "shop" space.   This is especially true in Texas where we regularly hit temps above 100 outside.  I was walking a job last week and saw this house being built with several house AC buckets dumping into the garage.  I'm sure that builder will sell this feature as a huge benefit, but if you take a minute to think about it that's going to be a MAJOR suck on the house (pun intended).  Check out this video I made about it and my recomended way to add HVAC to your garage. 


Best,
Matt Risinger - Risinger Homes in Austin, TX

Risinger Homes is a custom builder and whole house remodeling contractor that specializes in Architect driven and fine craftsmanship work. We utilize an in-house carpentry staff and the latest building science research to build dramatically more efficient, healthy and durable homes.
Be sure to check out my video blog on YouTube.

Twitter - New to Tweeting

$
0
0


I'm relatively new to Twitter having only been on it for a few months, but so far I've really liked it.  I follow a few of my favorite Building Science teachers and bloggers.  Here's an example of a blogger I follow; Allison Bailes who regularly updates his followers on new posts.  That is a terrific article and I likely would have missed it had I not been on Twitter today.  Here's my twitter feed page if you are interested in seeing what I'm posting.  https://twitter.com/MattRisinger

Best,
Matt Risinger

Viewing all 122 articles
Browse latest View live